Robot calibration
Encyclopedia
Robot calibration is the process of determining the actual values of kinematic
and dynamic parameters of an industrial robot
(IR). Kinematic parameters describe the relative position and orientation of links and joints in the robot while the dynamic parameters describe arm and joint masses and internal friction.
A calibrated robot has a higher absolute positioning accuracy than an uncalibrated one, i.e., the real position of the robot end effector corresponds better to the position calculated from the mathematical model of the robot. Absolute positioning accuracy is particularly relevant in connection with robot exchangeability and off-line programming of precision applications. Besides the calibration of the robot, the calibration of its tools and the workpieces it works with (the so-called cell calibration) can minimize occurring inaccuracies and improve process security.
 The robot errors gathered by pose measurements can be minimized by numerical optimization
. For kinematic calibration
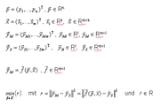
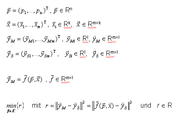
, a complete kinematical model of the geometric structure must be developed, whose parameters then can be calculated by mathematical optimization. The common system behaviour can be described with the vector model function as well as input and output vectors (see figure).
The variables k, l, m, n and their derivates describe the dimensions of the single vector spaces. Minimization of the residual error r for the purpose of identification of the optimal parameter vector p follows from the difference between both output vectors using the Euclidean norm.
For solving the kinematical optimization problems least-squares descent methods are convenient, e.g. a modified quasi-Newton method. This procedure supplies corrected kinematical parameters for the measured machine, which then for example can be used to update the system variables in the controller in order to adapt the used robot model to the real kinematics.
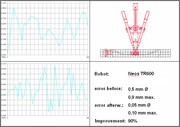 The positioning accuracy of industrial robots varies by manufacturer, age, and robot type. The magnitude of the error between the actual position and the desired position can be as low as a tenth of a millimeter, or as high as several centimeters. Using kinematic calibration, these errors can be reduced to less than a millimeter in most cases. An example of this is shown in the figure to the right.
Further examples for precision applications are robot-guided hemming in car body manufacturing, assembly of mobile phones, drilling, riveting and milling in aerospace industry and increasingly medical applications.
Kinematics
Kinematics is the branch of classical mechanics that describes the motion of bodies and systems without consideration of the forces that cause the motion....
and dynamic parameters of an industrial robot
Industrial robot
An industrial robot is defined by ISO as an automatically controlled, reprogrammable, multipurpose manipulator programmable in three or more axes...
(IR). Kinematic parameters describe the relative position and orientation of links and joints in the robot while the dynamic parameters describe arm and joint masses and internal friction.
A calibrated robot has a higher absolute positioning accuracy than an uncalibrated one, i.e., the real position of the robot end effector corresponds better to the position calculated from the mathematical model of the robot. Absolute positioning accuracy is particularly relevant in connection with robot exchangeability and off-line programming of precision applications. Besides the calibration of the robot, the calibration of its tools and the workpieces it works with (the so-called cell calibration) can minimize occurring inaccuracies and improve process security.
Accuracy criteria and error sources
The international standard ISO 9283 is setting different performance criteria for IR and suggesting test procedures in order to obtain appropriate parameter values. The most important criteria, and also the most commonly used, are accuracy of pose (AP) and repeatability of pose (RP). Repeatability is particularly important when the robot is moved towards the command positions manually („Teach-In“). If the robot program is generated by a 3D simulation („off-line programming“), absolute accuracy is vital, too. Both are generally influenced in a negative way by kinematic factors. Here especially the joint offsets and deviations in lengths and angles between the individual robot links take effect.Measurement systems
There exist different possibilities for pose measurement with industrial robots, e.g. touching reference parts, using supersonic distance sensors, laser interferometry, theodolites, calipers or laser triangulation. Furthermore there are camera systems which can be attached in the robot’s cell or at the IR mounting plate and acquire the pose of a reference object. Measurement and calibration systems are made by such companies as Dynalog, FARO Technologies, Leica, Metris, Metronor, Wiest, Teconsult and Automated Precision,Inc..Mathematical principles

Optimization (mathematics)
In mathematics, computational science, or management science, mathematical optimization refers to the selection of a best element from some set of available alternatives....
. For kinematic calibration
Kinematics
Kinematics is the branch of classical mechanics that describes the motion of bodies and systems without consideration of the forces that cause the motion....
, a complete kinematical model of the geometric structure must be developed, whose parameters then can be calculated by mathematical optimization. The common system behaviour can be described with the vector model function as well as input and output vectors (see figure).
The variables k, l, m, n and their derivates describe the dimensions of the single vector spaces. Minimization of the residual error r for the purpose of identification of the optimal parameter vector p follows from the difference between both output vectors using the Euclidean norm.
For solving the kinematical optimization problems least-squares descent methods are convenient, e.g. a modified quasi-Newton method. This procedure supplies corrected kinematical parameters for the measured machine, which then for example can be used to update the system variables in the controller in order to adapt the used robot model to the real kinematics.
Results

Sample applications
In industry there is a general trend towards substitution of machine tools and special machines by industrial robots for certain manufacturing tasks whose accuracy demands can be fulfilled by calibrated robots. In the figure a current example is shown: In-line measurement in automotive manufacturing, where the common „measurement tunnel“ used for 100% inspection with many expensive sensors are partly replaced by IR which carry only one sensor each. This way the total costs of a measurement cell can be reduced significantly. Furthermore the station can be re-used after a model change by simple re-programming without mechanical adaptations.Further examples for precision applications are robot-guided hemming in car body manufacturing, assembly of mobile phones, drilling, riveting and milling in aerospace industry and increasingly medical applications.
Summary
By application of efficient calibration methods it is possible with today’s industrial robots – especially parallel kinematic manipulators – to achieve an accuracy of pose of 0.1 mm in order to improve exchangeability, to simplify off-line programming, and to enable new, highly precise applications.Literature
- Beyer, L.; Wulfsberg, J.: Practical Robot Calibration with ROSY. In: Robotica, Vol. 22, Cambridge 2004, pp. 505–512.
- Tagiyev, N.; Alizade, R.: A Forward and Reverse Displacement Analysis for a 6-DOF In-Parallel Manipulator. In: Mech. Mach. Theory, Vol. 29, No. 1, London 1994, pp. 115–124.
- Trevelyan, J. P.: Robot Calibration with a Kalman Filter. Presentation at International Conference on Advanced Robotics and Computer Vision (ICARCV96), Singapore 1996.
- N.N.: ISO 9283 - Manipulating industrial robots. Performance criteria and related test methods. ISO, Geneva 1998.

