
Lapping
Encyclopedia
Lapping is a machining
operation, in which two surfaces are rubbed together with an abrasive
between them, by hand movement or by way of a machine.
This can take two forms. The first type of lapping (traditionally called grinding
), typically involves rubbing a brittle material such as glass
against a surface such as iron
or glass itself (also known as the "lap" or grinding tool) with an abrasive such as aluminum oxide, jeweller's rouge, optician's rouge
, emery
, silicon carbide
, diamond
, etc., in between them. This produces microscopic conchoidal fracture
s as the abrasive rolls about between the two surfaces and removes material from both.
The other form of lapping involves a softer material such as pitch
or a ceramic
for the lap, which is "charged" with the abrasive. The lap is then used to cut a harder material—the workpiece. The abrasive embeds within the softer material which holds it and permits it to score across and cut the harder material. Taken to the finer limit, this will produce a polished surface such as with a polishing cloth on an automobile, or a polishing cloth or polishing pitch upon glass or steel.
Taken to the ultimate limit, with the aid of accurate interferometry
and specialized polishing machines or skilled hand polishing, lensmakers
can produce surfaces that are flat to better than 30 nanometers. This is one twentieth of the wavelength
of light from the commonly used 632.8 nm helium neon laser light source. Surfaces this flat can be molecularly bonded (optically contacted
) by bringing them together under the right conditions. (This is not the same as the wringing effect of Johansson blocks
, although it is similar).
may be used as the lap, charged with emery, and used to cut a piece of hardened steel
. The small plate shown in the first picture is that of a hand lapping plate. That particular plate is made of cast iron
. In use, a slurry of emery powder would be spread on the plate and the workpiece simply rubbed against the plate, usually in a "figure-eight" pattern.
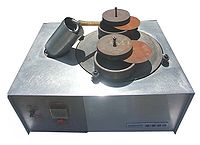 The second picture is that of a commercially available lapping machine which is needed for this process. The lap or lapping plate in this machine is 30 centimetres (11.8 in) in diameter. For a commercial machine, that is about the smallest size available. At the other end of the size spectrum, machines with 8 to 10 ft (2.4 to 3 m) plates are not uncommon, and systems with tables 30 feet (9.1 m) in diameter have been constructed. Referring to the second picture again, the lap is the large circular disk on the top of the machine. On top of the lap are two rings. The workpiece would be placed inside one of these rings. A weight would then be placed on top of the workpiece. The weights can also be seen in the picture along with two fiber spacer disks that are just used to even the load.
In operation, the rings stay in one location as the lapping plate rotates beneath them. In this machine, a small slurry pump can be seen at the side, this pump feeds abrasive slurry onto the rotating lapping plate.
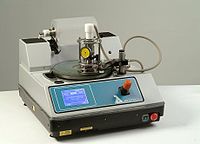 When there is a requirement to lap very small specimens (from 3" down to a few millimetres), a lapping jig can be used to hold the material while it is lapped (see Image 3, lapping machine and jig). A jig allows precise control of the orientation of the specimen to the lapping plate and fine adjustment of the load applied to the specimen during the material removal process. Due to the dimensions of such small samples, traditional loads and weights are too heavy as they would destroy delicate materials. The jig sits in a cradle on top of the lapping plate and the dial on the front of the jig indicates the amount of material removed from the specimen.
required for the latter.
 One complication in two-piece lapping is the need to ensure that neither piece flexes or is deformed during the process. As the pieces are moved past each other, part of each (some area near the edge) will be unsupported for some fraction of the rubbing movement. If one piece flexes due to this lack of support, the edges of the opposite piece will tend to dig depressions into it a short distance in from the edge, and the edges of the opposite piece are heavily abraded by the same action - the lapping procedure assumes roughly equal pressure distribution across the whole surface at all times, and fails in this manner if the workpiece itself deforms under that pressure.
A typical range of surface roughness that can be obtained without resort to special equipment would fall in the range of 1 to 30 Ra (average roughness in micrometers or microinches).
Surface accuracy or flatness is usually measured in Helium Light Bands, one HLB measuring about 0.000011 inches (280 nm). Again, without resort to special equipment accuracies of 1 to 3 HLB are typical. Though flatness is the most common goal of lapping, the process is also used to obtain other configurations such as a concave or convex surface.
is with a height gage positioned on a surface plate. Note that you must setup the part on three stands and find the minimum variation while adjusting them, just placing the part on the surface plate and using a dial indicator to find TIR on the opposite side of the part measures parallelism. Flatness is more easily measured with a co-ordinate measuring machine. But neither of these methods can measure flatness more accurately than about 0.0001" (2.5μm).
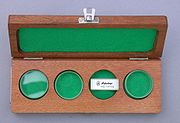
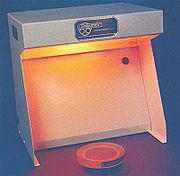 Another method that is commonly used with lapped parts is the reflection and interference of monochromatic light. A monochromatic light source and an optical flat are all that are needed. The optical flat – which is a piece of transparent glass that has itself been lapped and polished on one or both sides – is placed on the lapped surface. The monochromatic light is then shone down through the glass. The light will pass through the glass and reflect off the workpiece. As the light reflects in the gap between the workpiece and the polished surface of the glass, the light will interfere with itself creating light and dark fringes. Each fringe – or band – represents a change of one half wavelength in the width of the gap between the glass and the workpiece. The light bands display a contour map of the surface of the workpiece and can be readily interpreted for flatness. In the past the light source would have been provided by a Helium lamp or tube, but nowadays a more common source of monochromatic light is the low pressure sodium lamp.
The picture to the right shows a typical monochromatic light unit used in workshops and laboratories.
For a more thorough description of the physics behind this measurement technique, see interference.
Surface roughness is measured with a profilometer
, an instrument that measures the minute variations in height of the surface of a workpiece.
Machining
Conventional machining is a form of subtractive manufacturing, in which a collection of material-working processes utilizing power-driven machine tools, such as saws, lathes, milling machines, and drill presses, are used with a sharp cutting tool to physical remove material to achieve a desired...
operation, in which two surfaces are rubbed together with an abrasive
Abrasive
An abrasive is a material, often a mineral, that is used to shape or finish a workpiece through rubbing which leads to part of the workpiece being worn away...
between them, by hand movement or by way of a machine.
This can take two forms. The first type of lapping (traditionally called grinding
Grinding machine
A grinding machine, often shortened to grinder, is a machine tool used for grinding, which is a type of machining using an abrasive wheel as the cutting tool...
), typically involves rubbing a brittle material such as glass
Glass
Glass is an amorphous solid material. Glasses are typically brittle and optically transparent.The most familiar type of glass, used for centuries in windows and drinking vessels, is soda-lime glass, composed of about 75% silica plus Na2O, CaO, and several minor additives...
against a surface such as iron
Iron
Iron is a chemical element with the symbol Fe and atomic number 26. It is a metal in the first transition series. It is the most common element forming the planet Earth as a whole, forming much of Earth's outer and inner core. It is the fourth most common element in the Earth's crust...
or glass itself (also known as the "lap" or grinding tool) with an abrasive such as aluminum oxide, jeweller's rouge, optician's rouge
Cerium(IV) oxide
Cerium oxide, also known as ceric oxide, ceria, cerium oxide or cerium dioxide, is an oxide of the rare earth metal cerium...
, emery
Emery (mineral)
Emery is a very hard rock type used to make abrasive powder. It largely consists of the mineral corundum , mixed with other species such as the iron-bearing spinels hercynite and magnetite, and also rutile...
, silicon carbide
Silicon carbide
Silicon carbide , also known as carborundum, is a compound of silicon and carbon with chemical formula SiC. It occurs in nature as the extremely rare mineral moissanite. Silicon carbide powder has been mass-produced since 1893 for use as an abrasive...
, diamond
Diamond
In mineralogy, diamond is an allotrope of carbon, where the carbon atoms are arranged in a variation of the face-centered cubic crystal structure called a diamond lattice. Diamond is less stable than graphite, but the conversion rate from diamond to graphite is negligible at ambient conditions...
, etc., in between them. This produces microscopic conchoidal fracture
Conchoidal fracture
Conchoidal fracture describes the way that brittle materials break when they do not follow any natural planes of separation. Materials that break in this way include flint and other fine-grained minerals, as well as most amorphous solids, such as obsidian and other types of glass.Conchoidal...
s as the abrasive rolls about between the two surfaces and removes material from both.
The other form of lapping involves a softer material such as pitch
Pitch (resin)
Pitch is the name for any of a number of viscoelastic, solid polymers. Pitch can be made from petroleum products or plants. Petroleum-derived pitch is also called bitumen. Pitch produced from plants is also known as resin. Products made from plant resin are also known as rosin.Pitch was...
or a ceramic
Ceramic
A ceramic is an inorganic, nonmetallic solid prepared by the action of heat and subsequent cooling. Ceramic materials may have a crystalline or partly crystalline structure, or may be amorphous...
for the lap, which is "charged" with the abrasive. The lap is then used to cut a harder material—the workpiece. The abrasive embeds within the softer material which holds it and permits it to score across and cut the harder material. Taken to the finer limit, this will produce a polished surface such as with a polishing cloth on an automobile, or a polishing cloth or polishing pitch upon glass or steel.
Taken to the ultimate limit, with the aid of accurate interferometry
Interferometry
Interferometry refers to a family of techniques in which electromagnetic waves are superimposed in order to extract information about the waves. An instrument used to interfere waves is called an interferometer. Interferometry is an important investigative technique in the fields of astronomy,...
and specialized polishing machines or skilled hand polishing, lensmakers
Lens (optics)
A lens is an optical device with perfect or approximate axial symmetry which transmits and refracts light, converging or diverging the beam. A simple lens consists of a single optical element...
can produce surfaces that are flat to better than 30 nanometers. This is one twentieth of the wavelength
Wavelength
In physics, the wavelength of a sinusoidal wave is the spatial period of the wave—the distance over which the wave's shape repeats.It is usually determined by considering the distance between consecutive corresponding points of the same phase, such as crests, troughs, or zero crossings, and is a...
of light from the commonly used 632.8 nm helium neon laser light source. Surfaces this flat can be molecularly bonded (optically contacted
Optical contact bonding
Optical contact bonding is a glueless process whereby two closely conformal surfaces are joined together, being held purely by intermolecular forces.-History:...
) by bringing them together under the right conditions. (This is not the same as the wringing effect of Johansson blocks
Gauge blocks
A gauge block is a precision ground and lapped length measuring standard...
, although it is similar).
Operation
By way of example, a piece of leadLead
Lead is a main-group element in the carbon group with the symbol Pb and atomic number 82. Lead is a soft, malleable poor metal. It is also counted as one of the heavy metals. Metallic lead has a bluish-white color after being freshly cut, but it soon tarnishes to a dull grayish color when exposed...
may be used as the lap, charged with emery, and used to cut a piece of hardened steel
Steel
Steel is an alloy that consists mostly of iron and has a carbon content between 0.2% and 2.1% by weight, depending on the grade. Carbon is the most common alloying material for iron, but various other alloying elements are used, such as manganese, chromium, vanadium, and tungsten...
. The small plate shown in the first picture is that of a hand lapping plate. That particular plate is made of cast iron
Cast iron
Cast iron is derived from pig iron, and while it usually refers to gray iron, it also identifies a large group of ferrous alloys which solidify with a eutectic. The color of a fractured surface can be used to identify an alloy. White cast iron is named after its white surface when fractured, due...
. In use, a slurry of emery powder would be spread on the plate and the workpiece simply rubbed against the plate, usually in a "figure-eight" pattern.

In operation, the rings stay in one location as the lapping plate rotates beneath them. In this machine, a small slurry pump can be seen at the side, this pump feeds abrasive slurry onto the rotating lapping plate.

Two-piece lapping
Where the mating of the two surfaces is more important than the flatness, the two pieces can be lapped together. The principle is that the protrusions on one surface will both abrade and be abraded by the protrusions on the other, resulting in two surfaces evolving towards some common shape (not necessarily perfectly flat), separated by a distance determined by the average size of the abrasive particles, with a surface roughness determined by the variation in the abrasive size. This yields closeness-of-fit results comparable to that of two accurately-flat pieces, without quite the same degree of testingMetrology
Metrology is the science of measurement. Metrology includes all theoretical and practical aspects of measurement. The word comes from Greek μέτρον , "measure" + "λόγος" , amongst others meaning "speech, oration, discourse, quote, study, calculation, reason"...
required for the latter.

Accuracy and surface roughness
Lapping can be used to obtain a specific surface roughness; it is also used to obtain very accurate surfaces, usually very flat surfaces. Surface roughness and surface flatness are two quite different concepts. Unfortunately, they are concepts that are often confused by the novice.A typical range of surface roughness that can be obtained without resort to special equipment would fall in the range of 1 to 30 Ra (average roughness in micrometers or microinches).
Surface accuracy or flatness is usually measured in Helium Light Bands, one HLB measuring about 0.000011 inches (280 nm). Again, without resort to special equipment accuracies of 1 to 3 HLB are typical. Though flatness is the most common goal of lapping, the process is also used to obtain other configurations such as a concave or convex surface.
Flatness
The easiest method for measuring flatnessFlatness
Flatness may refer to:*Flatness *Flatness *Flatness *Flatness *Flatness , a geometrical tolerance required in certain manufacturing situations*Flatness...
is with a height gage positioned on a surface plate. Note that you must setup the part on three stands and find the minimum variation while adjusting them, just placing the part on the surface plate and using a dial indicator to find TIR on the opposite side of the part measures parallelism. Flatness is more easily measured with a co-ordinate measuring machine. But neither of these methods can measure flatness more accurately than about 0.0001" (2.5μm).


The picture to the right shows a typical monochromatic light unit used in workshops and laboratories.
For a more thorough description of the physics behind this measurement technique, see interference.
Roughness
Surface roughness is defined by the minute variations in height of the surface of a given material or workpiece. The individual variances of the peaks and valleys are averaged (Ra reading), or quantified by the largest difference from peak-to-valley (Rz). Roughness is usually expressed in microinches. A surface that exhibits an Ra of 8 consists of peaks and valleys that average no more than 8 microinches over a given distance. Roughness may be also measured by comparing the surface of the workpiece to a known sample. Calibration samples are available usually sold in a set and usually covering the typical range of machining operations from about 125 Ra to 1 Ra.Surface roughness is measured with a profilometer
Profilometer
Profilometer is a measuring instrument used to measure a surface's profile, in order to quantify its roughness.While the historical notion of a profilometer was a device similar to a phonograph that measures a surface as the surface is moved relative to the contact profilometer's stylus, this...
, an instrument that measures the minute variations in height of the surface of a workpiece.
See also
- Flat honingFlat honingFlat honing is a metalworking grinding process used to provide high quality flat surfaces. It combines the speed of grinding or honing with the precision of lapping. It has also been known under the terms high speed lapping and high precision grinding.- Origin of term :The term is derived from...
- a variation of very fine grinding - Surface metrologySurface metrologySurface metrology is the measurement of small-scale features on surfaces, and is a branch of metrology. Surface primary form, surface waviness and surface roughness are the parameters most commonly associated with the field...
for a brief description of these devices.

