Signature image processing
Encyclopedia
Weld monitoring, testing and analysis here refers primarily to technological methods and actions to test or assure the quality of welds, and secondarily to technological methods to confirm the presence, location and coverage of welds. Please see welding
for visual methods performed by personnel during the welding process.
.
. Since the similarity of materials between the weld and the workpiece, and between good and defective areas provides little inherent contrast, the latter usually requires methods other than simple imaging.
for visual methods performed by personnel during the welding process.
On vehicular applications, it has the goal of enabling improvements in the quality, durability, and safety of vehicles, with cost savings in the avoidance of recalls to fix the large proportion of systemic quality problems that arise from suboptimal welding. Quality monitoring in general of automatic welding can save production downtime, and can reduce the need for product reworking and recall.
 Signature Image Processing (SIP) is a technology for analyzing electrical data collected from welding processes. Acceptable welding requires exact conditions; variations in conditions can cause a weld to be unacceptable. SIP allows welding faults to be identified in real time, measures the stability of welding processes, and enables welding processes to be optimized.
on the complex physical phenomena that occur in welding arcs. The critical realization was that a way of determining the quality of a weld could be developed without a definitive understanding of those phenomena. The development involved a number of advances. The first was a method for handling sampled data blocks by treating them as phase-space portrait signatures with appropriate image processing. Typically, one second's worth of sampled welding voltage and current data are collected from GMAW pulse or short arc welding processes. The data is converted to a 2D histogram, and signal-processing operations such as image smoothing are performed. The second advance was a technique for analyzing welding signatures based on statistical methods from the social sciences, such as principal component analysis. The relationship between the welding voltage and the current reflects the state of the welding process, and this information is contained in the signature image. Comparing signatures quantitatively using principal component analysis allows for the spread of signature images, enabling faults to be detected and identified The system includes algorithms and mathematics appropriate for real-time welding analysis on personal computers, and the multidimensional optimization of fault-detection performance using experimental welding data. Comparing signature images from moment to moment in a weld provides a useful estimate of how stable the welding process is. "Through-the-arc" sensing, by comparing signature images when the physical parameters of the process change, leads to quantitative estimates—for example, of the position of the weld bead.
Unlike systems that log information for later study or that use X-rays or ultrasound to check samples, this technology looks at the electrical signal and detects faults when they occur. Data blocks of 4,000 points of electrical data are collected four times a second and converted to signature images. After image processing operations, statistical analyses of the signatures provide quantitative assessment of the welding process, revealing its stability and reproducibility, and providing fault detection and process diagnostics. A similar approach, using voltage-current histograms and a simplified statistical measure of distance between signature images has been evaluated for tungsten inert gas (TIG) welding by researchers from Osaka University.
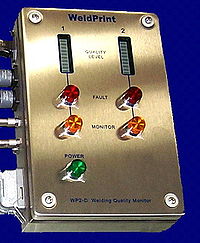
SIP is the basis for the WeldPrint system (owned by the University of Sydney). WeldPrint was developed with the assistance of an Australian government R&D Start grant (1999–2001), after support by the Australian Research Council
for the fundamental research (1997–2001). The system consists of a front-end interface and software based on the SIP engine, and relies on electrical signals alone. It is designed to be non-intrusive and sufficiently robust to withstand harsh industrial welding environments. The first major purchaser of the technology, GM Holden
provided feedback that allowed the system to be refined in ways that increased its industrial and commercial value. Improvements in the algorithms, including multiple parameter optimization with a server network, have led to an order-of-magnitude improvement in fault-detection performance over the past five years.
 WeldPrint for arc welding became available in mid-2001. About 70 units have been deployed since 2001; of these, about 90% are used on the shop floors of automotive manufacturing companies and their suppliers. The industrial users include Lear (UK)
, Unidrive, GM Holden, Air International
and QTB Automotive (Australia). Units have been leased to Australian companies such as Rheem, Dux, and OneSteel
for welding evaluation and process improvement.
The WeldPrint software received the Brother business software of the year award (2001); in 2003, the technology received the A $100,000 inaugural Australasian Peter Doherty Prize for Innovation;
and WTi, the University's original spin-off company, received an AusIndustry Certificate of Achievement in recognition of the development.
SIP has opened opportunities for researchers to use it as a measurement tool both in welding and in related disciplines, such as structural engineering. Research opportunities have opened up in the application of biomonitoring of external EEGs
, where SIP offers advantages in interpreting the complex signals
Welding
Welding is a fabrication or sculptural process that joins materials, usually metals or thermoplastics, by causing coalescence. This is often done by melting the workpieces and adding a filler material to form a pool of molten material that cools to become a strong joint, with pressure sometimes...
for visual methods performed by personnel during the welding process.
Weld testing and analysis
Weld testing and analysis checks the quality and correctness of the weld after it is completed. This term generally refers to testing and analysis focused on the quality and strength of the weld, but may refer to technological actions to check for presence, position and extent of welds.X-ray
X-ray based weld inspection may be manual, done by an inspector on X-ray based images or video, or automated using machine visionMachine vision
Machine vision is the process of applying a range of technologies and methods to provide imaging-based automatic inspection, process control and robot guidance in industrial applications. While the scope of MV is broad and a comprehensive definition is difficult to distil, a "generally accepted...
.
Visible light imaging
Inspection may be manual, done by an inspector using imaging equipment, or automated using machine visionMachine vision
Machine vision is the process of applying a range of technologies and methods to provide imaging-based automatic inspection, process control and robot guidance in industrial applications. While the scope of MV is broad and a comprehensive definition is difficult to distil, a "generally accepted...
. Since the similarity of materials between the weld and the workpiece, and between good and defective areas provides little inherent contrast, the latter usually requires methods other than simple imaging.
Ultrasonic and acoustic based methods
Ultrasonic testing utilizes the principle that a gap in the weld changes the propagation of ultrasonic sound through the metal.Weld monitoring
Weld monitoring checks the quality and correctness of the weld while the weld is in process. The term is generally applied to automated monitoring for weld quality purposes and secondarily for process control purposes such as vision based robot guidance. Please see weldingWelding
Welding is a fabrication or sculptural process that joins materials, usually metals or thermoplastics, by causing coalescence. This is often done by melting the workpieces and adding a filler material to form a pool of molten material that cools to become a strong joint, with pressure sometimes...
for visual methods performed by personnel during the welding process.
On vehicular applications, it has the goal of enabling improvements in the quality, durability, and safety of vehicles, with cost savings in the avoidance of recalls to fix the large proportion of systemic quality problems that arise from suboptimal welding. Quality monitoring in general of automatic welding can save production downtime, and can reduce the need for product reworking and recall.
Signature image processing method

Development
The idea of using electrical data analyzed by algorithms to assess the quality of the welds produced in robotic manufacturing emerged in 1995 from research by Associate Professor Stephen Simpson at the University of SydneyUniversity of Sydney
The University of Sydney is a public university located in Sydney, New South Wales. The main campus spreads across the suburbs of Camperdown and Darlington on the southwestern outskirts of the Sydney CBD. Founded in 1850, it is the oldest university in Australia and Oceania...
on the complex physical phenomena that occur in welding arcs.

Unlike systems that log information for later study or that use X-rays or ultrasound to check samples, this technology looks at the electrical signal and detects faults when they occur. Data blocks of 4,000 points of electrical data are collected four times a second and converted to signature images. After image processing operations, statistical analyses of the signatures provide quantitative assessment of the welding process, revealing its stability and reproducibility, and providing fault detection and process diagnostics. A similar approach, using voltage-current histograms and a simplified statistical measure of distance between signature images has been evaluated for tungsten inert gas (TIG) welding by researchers from Osaka University.
SIP is the basis for the WeldPrint system (owned by the University of Sydney). WeldPrint was developed with the assistance of an Australian government R&D Start grant (1999–2001), after support by the Australian Research Council
Australian Research Council
The Australian Research Council is the Australian Government’s main agency for allocating research funding to academics and researchers in Australian universities. Its mission is to advance Australia’s capacity to undertake research that brings economic, social and cultural benefit to the...
for the fundamental research (1997–2001). The system consists of a front-end interface and software based on the SIP engine, and relies on electrical signals alone. It is designed to be non-intrusive and sufficiently robust to withstand harsh industrial welding environments. The first major purchaser of the technology, GM Holden
Holden
GM Holden Ltd is an automaker that operates in Australia, based in Port Melbourne, Victoria. The company was founded in 1856 as a saddlery manufacturer. In 1908 it moved into the automotive field, before becoming a subsidiary of the U.S.-based General Motors in 1931...
provided feedback that allowed the system to be refined in ways that increased its industrial and commercial value. Improvements in the algorithms, including multiple parameter optimization with a server network, have led to an order-of-magnitude improvement in fault-detection performance over the past five years.
Industrial use

Lear (company)
Lear Corporation , headquartered in Southfield, Michigan, USA is a Fortune 500 company, engaged in the business of manufacturing and distribution of automotive interiors systems...
, Unidrive, GM Holden, Air International
Air International
AIR International is a British aviation magazine covering current defence aerospace and civil aviation topics. It has been in publication since 1971 and is currently published by Key Publishing Ltd....
and QTB Automotive (Australia). Units have been leased to Australian companies such as Rheem, Dux, and OneSteel
OneSteel
OneSteel is an Australian-based mining, ore processing and steel manufacturing company specialising in steel-long products for the construction, mining, transport and agricultural industries...
for welding evaluation and process improvement.
The WeldPrint software received the Brother business software of the year award (2001); in 2003, the technology received the A $100,000 inaugural Australasian Peter Doherty Prize for Innovation;
and WTi, the University's original spin-off company, received an AusIndustry Certificate of Achievement in recognition of the development.
SIP has opened opportunities for researchers to use it as a measurement tool both in welding and in related disciplines, such as structural engineering. Research opportunities have opened up in the application of biomonitoring of external EEGs
Electroencephalography
Electroencephalography is the recording of electrical activity along the scalp. EEG measures voltage fluctuations resulting from ionic current flows within the neurons of the brain...
, where SIP offers advantages in interpreting the complex signals

